Sams
Your source for the news, opinions, and reader reaction on the industry’s hottest controversy.
In this lesson you will learn about the browsers that are most compatible with SharePoint, learn some tips about configuring IE 7.0 for optimal use with SharePoint, how to create a network location for a SharePoint site, and some tips for quickly navigating to SharePoint sites of interest.
Supported Browsers
Most users are familiar with how to use Internet Explorer (IE) to access sites on the Internet, and the same basic skills are required to access SharePoint sites. It is assumed that you know how to open a browser, enter in a URL, and understand that there is a difference between a URL that starts with http:// and one that starts with https://. It is also assumed that you know how to create favorites and change the default home page for your browser.
SharePoint supports access from other browsers, but IE 6.0 or 7.0 for Windows are recommended because Microsoft rates these browsers as “Level 1 Web Browsers” that will provide the most complete user experience due to their support of ActiveX controls. So users of these browsers are essentially guaranteed that all of the tools available in SharePoint will work reliably.
Microsoft rates a number of other browsers as Level 2 Web Browsers which may provide a different user experience based on their design and lesser support for ActiveX. The following browsers are supported, some with limitations:
Firefox 1.5 (Windows, Linux/UNIX, Macintosh OSX)
Mozilla 1.7 (Windows)
NetScape Navigator 7.2 (Linux/UNIX)
NetScape Navigator 8.1 (Windows)
Safari (Macintosh OSX)
Browsers not listed as either a Level 1 or Level 2 browser are not technically supported by Microsoft, for example older versions of IE (5.x) or older versions of the browsers listed in the list above. Microsoft gives additional information about exactly which features are compatible with the different browsers on the following page: https://technet.microsoft.com/en-us/library/cc263526.aspx.
This chapter will only cover IE 7.0 due to space limitations and since it tends to be the standard in most organizations. This chapter won’t cover IE basics, such as entering a URL or saving a favorite as those should processes should be familiar to most readers.
Tips for Internet Options Settings for IE 7.0
Hidden under the Tools menu in IE 7.0 is the Internet Options tool. Within the Internet Options dialog box is an extensive set of tools that affects how IE behaves relative to SharePoint sites. This section will give a couple of tips to make IE more friendly with SharePoint sites. Bear in mind, of course, that extensive experimentation with IE settings can have unexpected results, so tread lightly and make changes one at a time if possible.
The first tip involves a quick configuration that changes how IE 7.0 refreshes pages when accessing a SharePoint site. This guarantees that the page is redrawn every time you visit it, rather than only when IE is started, or “automatically.” This can be especially useful when looking at different versions of the same page during the editing process.
Open IE 7.0 and access the Tools drop-down menu next to the tabs (or click the Alt key to expose the menus, and click the Tools menu)
Click on Internet Options.
As shown in Figure 2.1 then click on the Settings button in the Browsing History section and select Every time I visit the webpage.
Click OK and then OK again to close the Internet Options window.
Caution – Before changing any of the settings in the Internet Options dialog box, check with your Site Administrator or help desk to see whether it’s okay to do so. Some organizations lock down the settings in IE, and you won’t be able to change any settings, whereas others have standards and guidelines they follow and simply discourage any changes.
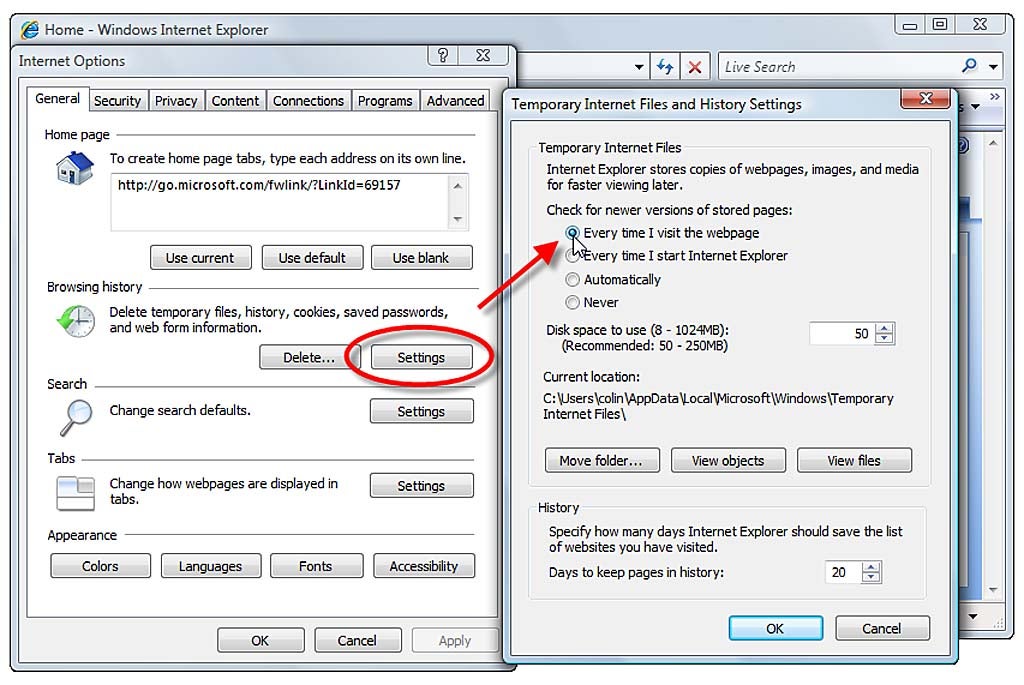
Changing the Check for new versions of stored pages setting in IE 7.0.
The next tip can be handy if you are constantly prompted to enter your user name and password when accessing a SharePoint site. IE 7.0 has multiple security zones that can be managed in the Internet Options tool discussed in the previous section. IE has settings that enable it to “know” when a site should be in the Local Intranet zone, but sometimes it does not include the SharePoint site you need to access. Follow the following steps to resolve this issue:
Open IE 7.0 and access the Tools drop-down menu next to the tabs (or click the Alt key to expose the menus, and click the Tools menu)
Click on Internet Options.
Click on the Security tab and select the Trusted Sites icon from the list of zones.
Click on the Sites button and add your SharePoint site to the list by typing it in the “Add this website to the zone” field, and clicking the Add button. You may need to uncheck the “Require server verification (https:) for all sites in this zone” if you receive and error message. Then click Close.
Click on the Custom Level button near the bottom of the screen, as shown in Figure 2.2, and then scroll down to the bottom of the Security Settings window that opens, and select Automatic logon with current user name and password.
Click OK and then OK to close the Internet Options window.

Changing logon settings for the Trusted Sites zone in IE 7.0.
Adding a Network Location
This next section might be considered a bit advanced for the second chapter in a Sams Teach Yourself book, but the steps shown in this section will prove useful throughout your SharePoint experience. Creating a Network Location makes it very easy to save files to a favorite SharePoint site from within a standard Office application, because the Network Location will be easier to access than typing in the URL for the SharePoint library. For more adventurous users, navigating within the Network Location provides a detailed view of the folders and files that SharePoint contains and manages. For developers who want to write scripts that access SharePoint content, the mapping of a SharePoint site to a network drive can also prove very useful.
Assuming that you have Windows Vista follow these steps to add a Network Location:
Click on the Start button, and select Computer.
Right click in the Network Location section, and select Add a Network Location. The Add Network Location Wizard will start. Click Next.
Select Choose a custom network location. Click Next.
Type in the Internet or network address (for example http://abcmoss02) and then click Next. Enter user name and password if prompted.
Then type a name for the location if a more descriptive name would be helpful (for example Home Page on ABCMOSS02) and click Next.
Leave “Open this network location when I click Finish” checked and click Finish.
The Network Location will now open, as shown in Figure 2.3.

A Network Location that points to a SharePoint site.
To many users, SharePoint starts to make more sense when viewed in this folder structure, which strips away the fancy “chrome” of the browser environment. As shown in Figure 2.3 there are a number of hidden folders (such as _catalogs, _cts and _private) as well as folders whose names reflect their contents (such as Docs, Documents, FormServer Templates, images, Lists, News and others). In this example the user could navigate to the Docs folder (which corresponds to the site titled Document Center) open it and see the Documents folder within it (which corresponds to the Documents library). The user could actually paste a document into the Network Location window shown in Figure 2.3 (assuming of course she has sufficient rights to add a document to the library).
Tip – You can also map a SharePoint site, list or library as a network drive by using the Tools > Map Network Drive option. Simply choose an unused drive letter (such as Z:) and then type in the path for the site or document library (for example abcmoss02) and enter user name and password if needed. Figure 2.4 shows an example of a drive mapped to a root SharePoint site.
Figure 2.4
Viewing a SharePoint site that has been mapped as a network drive in Vista.

Caution – Be careful not to delete files in a SharePoint folder if you have Administrative rights on the site because this can damage the site and stop it from functioning properly.
Navigating Within SharePoint
The following section gave examples of accessing a SharePoint environment through a Network Location, and this section covers in some more detail the navigation tools available in the user interface. Chapter 1 mentioned several of the basic navigational elements that are available in a SharePoint environment, including the tabs on the navigation bar, as well as the Quick Launch area which can include links to document libraries, lists and sub sites, and the Tree View, which can also provide navigational help. These tools are pretty self explanatory from a user standpoint, so additional time won’t be devoted to them in this chapter. Instead some of the more “hidden” navigational tools will be presented.
At the top level of many SPS 2007 environments, there is a Sites tab that provides a site that lists which sites (and can include lists and libraries) are available to the user. An example is shown in Figure 2.5. Note that this site directory option is not available in WSS 3.0. Typically the “Categories” tab is the first to be displayed when a user reaches the Sites site, so the user must click on the Site Map tab to see the full list. SharePoint will only show sites to the user that he or she has the appropriate privileges to access. Figure 2.5 shows several sites in the Site Map tab: the Document Center, News, Reports, Search, Sites and Test1. While it is slightly difficult to discern, the entry “Test1” is a site located under the “Sites” site.

Viewing the Site Map tab in a Site Directory.
Another helpful navigation tool can be found by clicking on the My Links drop down menu in the upper right hand corner. This is a SharePoint specific menu that can contain links that an administrator chooses to include for different groups of users, or to which you can add links you always want to have available when you access the SharePoint environment. These can be especially helpful if you use a variety of different computers to access the SharePoint environment, such as a desktop at work, and a different one at home, or a laptop on the road. To add a link to My Links follow these steps:
Click on the My Links drop down menu in the upper right hand corner.
Click on Add to My Links.
In the Add Link window that opens modify the default title if needed, select what audience can see the link (the choices are Everyone, My Colleagues, My Workgroup, My Manager or Only Me), chose an existing group or create a new group. In this example the Only Me audience is selected, and a new group called “My Preferred Sites” is created. Figure 2.6 shows these settings. Click OK to save the settings.

The Add Link window.
Now when the My Links menu is accessed the new entry will be included. The lists of My Links can also be managed by clicking on the Manage Links entry under the My Links menu.
Summary
This lesson clarified that SharePoint supports IE 6.0 and 7.0 the most completely, and that support for other browsers may have limitations, and provided a link to Microsoft.com if you would like more information on the specifics of features that are or are not supported. Tips were provided on configuration tweaks that can be made to IE 7.0 to ensure that a SharePoint page is reloaded every time it is visited, and to add a SharePoint site to the trusted sites zone in IE 7.0 and configured Internet Options so the current user name and password are used to potentially avoid having to log in every time a SharePoint site is accessed. The steps required to create a network location in Vista are provided, as well as mapping a drive on your computer to a SharePoint site. Finally two tools – the Site Directory, and the My Links menu – were presented to help with navigating around SharePoint site collections.
© Copyright Pearson Education. All rights reserved.