Retaining and “journaling” content has been a key requirement of organizations for years, however as organizations have migrated to Office 365, plus with Microsoft’s shift to new and improved eDiscovery tools, the process of “holding” and “searching” for content has changed.
This article covers a whole new series of best practices that EVERY legal department, compliance officer, and content / Office 365 administrator needs to read, understand, and ensure they have Office 365 setup properly so that when the time comes and they need to do eDiscovery of content, that the information they are looking for has actually been held and managed for future look-up.
This document clarifies what’s included “in the box” in Office 365 with the E3 (or higher) license, the “Advanced eDiscovery” functions you get with Office 365 with the E5 license, and goes through the step by step procedures for setting up what is necessary to retain content and detailed procedures on how to query and look up information.
Basic Background
To be able to retrieve information for legal or official purposes, information must be properly retained (lawyers may say-LMS-“preserved) so that the integrity of the information retrieved is valid (lawyers will request an “audit trail” to verify and authenticate the information by showing the “chain of custody” and who, and how, it was “preserved and collected”). As an example, if the Human Resources department, Legal department, or outside Legal Counsel wants to gather information, it’s not good enough to just go into a user’s mailbox and extract information because the information in a mailbox is considered “fragile.” It is fragile because a user can easily “delete” a key message or the user can even go in using the Microsoft Outlook client and complete EDIT and CHANGE a message. If someone opens a user’s mailbox, the messages in the Outlook client can be tampered (LMS-modified) and are NOT considered valid evidence (even if modified accidentally).
In the past with Exchange 2013, Exchange 2010, or earlier, it required specific technologies and practices to protect the messages from tampering. The old way of doing things was to enable “Journaling” and/or buy a 3rd party archiving product like Symantec Enterprise Vault, Iron Mountain / Mimosa NearPoint for Exchange, EMC EmailXtender, Zantaz EAS, or the like. The 3rd party tools required a separate server, typically a special agent to be installed on all Exchange servers and clients, and a relatively high expense to manage, maintain, and support the archiving server and services.
Replacing Journaling with Office 365 Mailbox Hold
As previously mentioned, for older email systems, organizations would commonly enable “Journaling” on their email system that effectively captured each and every email message and stored a copy of those email message in a completely separate server or storage system. However in Office 365, it is no longer a best practice to Journal messages, primarily because there are better ways of addressing the exact same business and legal need, without having to duplicate each and every email message.
With Office 365, organizations simply enable retention of the mailbox (or mailboxes) of users that the organization wants a legal history of each and every message in and out of a user’s mailbox. Many organizations enable all mailboxes for this type of hold, which in Office 365 is fine considering the organization no longer has to manage the growing storage of retained content.
AND better yet, since Office 365 includes more than just email, the same retention (and the same eDiscovery search that we’ll cover later in this article) can retain the history, state, and perform search on content stored as files in OneDrive, content stored in SharePoint Online, and Instant Message communications in Skype for Business. So when properly configured, an organization gets content retention and search across emails, files, and communications!
Say goodbye to the concept of journaling, and welcome in a better way of getting the exact same results that now spans more than just incoming and outgoing emails!
Archiving and Email Retention in Office 365
Archiving and Email Retention are related to this whole topic of Litigation Hold and eDiscovery, but address a different business need.
When email archiving became available in Exchange 2010, some mistakenly believed they must create an “Archive Mailbox” for all users to preserve data, that is not true. An Archive Mailbox creates a 2nd mailbox store for a user to move content out of their Primary mailbox and into the Archive mailbox. Back in the “old day” (prior to 2010), email servers had limits on how large their server databases could be, and thus organizations put arbitrary limits on how much email a user could store (6-months, 2-years, 256mb, 2gb, etc) information in their “primary mailbox” and when they ran out of space, they were required to delete emails.
Users not wanting to delete emails got creative and used mechanisms like “PST files” to export messages to files, however having users with USB thumb drives and laptops full of old emails became an even bigger problem when performing eDiscovery. These archives mailboxes in Exchange provided a secondary location for users to move their content to, that were still subject to eDiscovery search by the organization.
However today with Office 365, each user’s primary mailbox (with an E3 or higher license) can store at least 50GB of emails which is 20-30 times more mailbox space than most organizations even allowed just a few years ago, and since Microsoft pays for and manages storage, the need for an organization to export messages or move messages to archive mailboxes is no longer a business requirement.
And with a Microsoft Office 365 E3 license for a user, that user can have a 2nd mailbox, called the Archive Mailbox, if needed that effectively has an unlimited amount of storage, but again, it is not as common for organizations to have Archive mailboxes for all users as 50GB is plenty of storage space for almost all users.
As for as eDiscovery, Litigation Hold, Retention policies, or the like, whatever is done to a user’s Primary mailbox is also applied to their Archive mailbox, so from a legal or functional basis, it doesn’t matter if a user has just a Primary mailbox, or if they have both a Primary and Archive mailbox.
Archiving for the sake of archiving into a separate mailbox is no longer the motivating factor, as such, organizations that used to have archiving policies need to rethink whether they are applicable these days.
That said though, there are reasons an organization would want users to get rid of information, but instead of setting the limit at a completely arbitrary amount (by age or by storage limit), an organization’s retention policy these days (if they implement one) really HAS to be done based on a legal requirement. This might be tax or accounting records should be retained for 7-years, or content deemed applicable to the Sarbanes-Oxley Act (SOX) should be retained for 7-years, or the like. But there’s no magical age or size limit that is a “best practice”. Some might argue that emails should be kept for 2-years, or emails should be removed after 6-months, but those are again typically best practices of a decade ago when organizations solely wanted to remove content to fit within the technical storage limits of the email server systems themselves.
I cover how to create effective Electronically Stored Information (ESI) policies in my book “Handling Electronically Stored Information (ESI) in the Era of the Cloud” that can be purchased in print form off Amazon.com, or downloaded for free as a PDF or Kindle/Mobi format off my company website https://www.cco.com/our-publications.htm And to apply ESI policies in Office 365 through the use of Microsoft Messaging Records Management (MRM) policies will be a topic of a future article where I’ll get into the creation of granular policies based on content aging or keywords. For now, this article here will focus solely on enabling mailbox content retention and eDiscovery search as the foundation of Litigation Hold and eDiscovery practices.
What Can be Done “In the Box” in Office 365
While an organization can continue to buy 3rd party products as well as do Journaling with Office 365 (either with a Hybrid configuration with an Exchange server on-premise, or through a 3rd party Journaling server or cloud service), the easier and better way of handling message retention and legal recovery (LMS-“collection”) is to just set the proper configuration settings in Office 365.
When a user deletes a message from their mailbox, the message is not really deleted but instead moved to the Deleted Items folder and sits in the Deleted Items folder until the message is fully deleted from the Deleted Items folder. When a user deletes an item from the Deleted Items folder or empties the Deleted Items folder, the message disappears from the Deleted Items folder and it appears to be “gone”, but the message has actually just been moved to a hidden Recoverable Items folder. The Recoverable Items folder replaces the feature formerly known as the Dumpster in previous versions of Exchange. The Recoverable Items folder is hidden from the default view of Microsoft Outlook, Outlook WebApp, and other e-mail clients so the user no longer sees removed messages, but the messages are still sitting up in Office 365 for a short period of time.
Items in the Recoverable Items folder are retained for the deleted item retention period configured in Office 365. By default, the deleted item retention period is set to 14 days (or 30GB of storage, whichever comes first). While this retention period can be extended by the administrator in Exchange on-premise, the Office 365 administrator no longer has the ability to change the retention period beyond 30-days, and quite frankly with other options available in Office 365, no one needs to tinker with the retention period because there’s a better way of handling content retention (the whole focus of this article), so read on.
Enabling Litigation Hold
With Office 365, in lieu of Journaling (to retain a copy of all messages) or extension of the Retention period (longer than 14-days), the best practice in Office 365 is to enable mailbox In-Place Hold or Litigation Hold. This process effectively retains an immutable record of all email messages (and with In-Place / Litigation Hold placed on other Office 365 workloads like SharePoint Online, OneDrive, and Skype for Business), core content will be retained in Office 365 beyond just emails as well!
To put a Mailbox on Litigation Hold, the person making that decision needs to be part of the “Discovery Management” Role in Exchange. By default, no one in the organization, including the Office 365 Administrator, has this Discovery Management role. But the Office 365 Administrator has the permission to put users (including themselves) into this Discovery Management role.
For an individual (administrator, HR personnel, legal counsel) to be given the rights to make In-Place Hold and Litigation Hold changes to a user’s mailbox, do the following:
1. Logon to the Office 365 Admin Portal (https://portal.office.com) with a user logon that has rights to the Office 365 admin center.
2. On the lefthand side, scroll down to Admin and click on Exchange

3. In the Exchange admin center, click on “permissions”
4. On the “admin roles” page, double-click on “Discovery Management” and under Members, click the + button and add the users you want to give rights to Discovery Management in Exchange (emails) to this list of members, then click Save.

This individual (or individuals) now have the ability to proceed with actually putting a mailbox (or mailboxes) on In-Place Hold / Litigation Hold.
To put a mailbox on Hold in Office 365, an individual you added to this Discovery Management role needs to do the following:
1. Logon to the Office 365 Admin Portal (https://portal.office.com) with a user logon that has rights to the Office 365 admin center.
2. On the lefthand side, scroll down to Admin and click on Exchange
3. In the Exchange admin center, click on “recipients”, double-click on the user you want to put their mailbox on hold, click on “mailbox features”, scroll down to “Litigation hold”

4. For the “Litigation Hold” option, click Enable, that’ll pop up a new window. You can choose to enter the # of days you want a mailbox to be put on hold (ie: 365 for a year) or if you are looking to put the entire mailbox on hold indefinitely for “journaling” type of long term tracking, just leave the # of days blank and click Save.
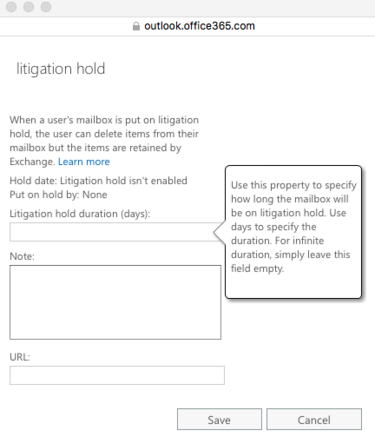
Note: It may take upwards of an hour before Litigation Hold takes effect on a user’s mailbox. This is because the policy needs to be enacted on all messages and folders in the user’s mailbox and the policy needs to be replicated through any replica instances of Office 365. You can see the status of Litigation Hold on a user’s mailbox by going back and looking at the “Mailbox Features” and it may show Litigation Hold “Enable – Pending” when it is in the process of enabling Litigation Hold. When the mailbox is fully held, the Mailbox Features will simply show “Litigation Hold: Enabled”

To put a mailbox on Hold in Office 365 via PowerShell, an individual you added to the Discovery Management role needs to run the following PowerShell command against the Office 365 environment:
Set-Mailbox username@domainname.com -LitigationHoldEnabled $true
{where username is the name of the user, and the @domainname.com is the name of the company’s domain name}
Similarly, a mailbox can be placed on hold for a period of time using:
Set-Mailbox username@domainname.com -LitigationHoldEnabled $true -LitigationHoldDuration 2555
{where 2555 is the # of days, which is approximately 7-years}
Or to place all mailboxes on Litigation hold for a year, the PowerShell command is:
Get-Mailbox -ResultSize Unlimited -Filter {RecipientTypeDetails -eq “UserMailbox”} | Set-Mailbox -LitigationHoldEnabled $true -LitigationHoldDuration 365
More specific details on this command sequence is up on: https://technet.microsoft.com/en-us/library/dn743673(v=exchg.160).aspx
Enabling Query-based Hold
While Litigation Hold places a user’s entire mailbox on hold, an organization may choose to select content to put on hold. This may be enabled for a user that will be working on a specific project or will hold a specific (regulated) role for a period of time, and the user’s mailbox content will be held during that period.
With a Query-based Hold, an administrator can choose which users it wants to retain content (all or selected users), and the administrator can also choose the period of retention (ie: 1-yr, 3-yr, forever). This is why email archiving and retention periods are no longer a separate thought process and configuration task, but rather all rolls up into the Query-based Holds process across all Office 365 workloads.
To put a mailbox on a Query-based Hold in Office 365, an individual you added to the Discovery Management role needs to do the following:
1. Logon to the Office 365 Admin Portal (https://portal.office.com) with a user logon that has rights to the Office 365 admin center.
2. On the lefthand side, scroll down to Admin and click on Exchange
3. In the Exchange admin center, click on “compliance management” and in the “in-place eDiscovery & hold” section click the + button to create a Hold policy

4. After pressing + in the “in-place eDiscovery & hold”, you’ll go through a series of pages to place all (or selected) mailboxes on hold. The first page is to enter in a Name and description of this particular hold (make it descriptive like “Hold Mary Smith and John Doe’s Mailboxes for all of 2015 and 2016” or “Hold All Exec Mgmt Mailboxes for 9 months”. After you enter in a name (and an optional description), click Next
5. You’ll now be prompted to choose “Search all mailboxes” or “Specify mailboxes to search”. Obviously click on the “Search all mailboxes” if you want to select all mailboxes for Hold, or you can choose “Specific mailboxes to search” and click on the + to then enter in the names and select users you want selected to put on hold. Click Next when done

6. You can now narrow down your Hold criteria. If you already put the entire mailbox on Litigation Hold, they you wouldn’t necessarily need to put the entire content of the mailbox on a Query-based hold. To selectively search for content, enter in start/end dates, and keyword criteria, or even choose to select messages only come from or to specific individuals that you want searched and held.
7. Click to select the “Place content matching the search query in selected sources on hold” and likely have the “Hold indefinitely” also selected, then click Finish. (this will put the content on hold until you specifically remove the hold), then click Finish.
With Litigation Hold and Query-based holds enabled, all messages, regardless of other retention policy limits, will be retained.
Searching for Content (aka eDiscovery) in Office 365
Searching for information, whether it is information actively in a user’s mailbox, edited or modified by the user, deleted from their mailbox (but not yet purged out of Office 365), or held for Litigation Hold is all searched the exact same way. The only difference is the amount of information that may be found (ie: mailboxes on Litigation Hold will find more information than a mailbox not on Hold, since mailboxes not on hold will almost inevitably have information deleted or content will have been modified/edited and not tracked and saved)
Key to searching is to choose words, date ranges, and other key parameters to help you zero in on the information you are looking for, but not narrow down so tightly that your search doesn’t find all the information you are looking for. As an example, if you simply search for information between Bob and Mary over a 30-day period, you might end up with 1000 messages that might be too much information to find what you are looking for. On the other hand, if you search for messages between Bob and Mary over the 30-day period with the key phrase “don’t tell anyone”, which might narrow down the search to say 8 messages, if at any point during the email thread either Bob or Mary deleted or changed the “don’t tell anyone” phrase in the email, those subsequent emails would not show up in your search results. This happens frequently as messages get really long, users may delete or truncate part of the message. Or if you only look for words in a Subject line but then one of the users change the Subject Line title, then your tight search may not result in what you were expecting to look for either.
It is recommended that you create a very small mailbox with only a few dozen messages inside it of it and try out the searching process to perfect your ability to look for (and ultimately find) information you are looking for before you try to look at a mailbox or several mailboxes with hundreds of thousands of email messages. Remember, this is a very specific search, it will find exactly what you are looking for, unlike searching the Web with Google or Bing where it finds information that “kind of” has the same words, or similar words and phrases, the eDiscovery search in Office 365 will only find 100% exact matches to what you query.
Additionally, when you do an e-Discovery search in Office 365, depending on your configuration, the results will provide you a list of messages but won’t specifically tell you where it found the message (in the user’s Inbox, Sent Mail, Deleted Items Folder, etc). Content will just be provided that the search found, which could be information from any of the following locations:
- Any folder in the user’s mailbox
- The Deleted Items folder which holds messages that have been deleted but not yet flushed from the Deleted Items folder
- The Recoverable Items / Deletions folder which contains messages deleted from the Deleted Items folder
- The Recoverable Items / Purges folder which is used for messages deleted while the mailbox is in Litigation Hold or Single Item Recovery
- The hidden Recoverable Items / Versions folder which contains messages that were edited or modified.
You may find multiple copies of what might look like the same message, however when you look deeper, you’ll find the message likely was modified, edited, deleted, and/or attempted to be purged. This is a good thing in eDiscovery, that it finds messages that have been edited or modified by the user so that you see ALL copies and versions, but you have to be aware when you search and find the content that the search results don’t clearly tell you “this is a message that John deleted” nor will you get a notice that’ll say “this is the email that Mary modified these 5 words”. You merely get lots of messages, and it is up to you to figure out what was modified, changed, deleted, etc.
To search for information using the native Office 365 eDiscovery search capabilities, do the following:
Assign Someone the Rights to Perform a Search Query
This is a one-time step that needs to be performed to give someone the rights to create a search query. By default, no one in the organization, including the Office 365 Administrator, has the rights to create search queries, but the Office 365 Administrator can give themselves permission to perform searches. So it’s just 1 extra step for the Office 365 Administrator to give themselves and others (like someone in legal counsel, human resources, compliance security, etc) search capabilities.
To assign the rights to create a search query, do the following:
1. Logon to the Office 365 Security & Compliance portal (https://protection.office.com) with a user logon that has rights to the Office 365 administration.
2. On the lefthand side, scroll down and click on Permissions

3. On the Permissions page, double-click on “eDiscovery Manager” and under eDiscovery Administrator, click the + button and add the users you want to give rights to search mailboxes, SharePoint folders, and/or OneDrive locations, then click Save.

This individual (or individuals) now have the ability to proceed with actually searching mailboxes, sites, and OneDrive locations. To search for content, do the following:
1. Logon to the Office 365 Security & Compliance portal (https://protection.office.com) with a user logon that has been given the eDiscovery Administrator permissions in the previous set of steps.
2. On the lefthand side, scroll down to Search & investigation, then click on Content search.
3. Click on + to create a new search, give your search a unique descriptive name (like “Search All Mailboxes for the Words Gunfight”)
4. Choose to “Search Everywhere” if you want to search all of Office 365 (Exchange emails, SharePoint files, and Public Folders), or click to choose specific users as well as specific content (so you can select one or a few selected users, you can select specific words, as well as you can choose to just check emails and not SharePoint). (click on “Learn more” for help with syntax). Lots of variations to the search.

5. Click Next to begin the search.
6. Click on “Preview search results” to see a list of emails (and documents, etc) that meet the criteria you specified in your search.

7. Click “Start Export” that will export the found content out to a PST that can used for preliminary review, or can be burned to a DVD and provided as official search results.

The content found from the search results is raw information, if the mailboxes were placed on Litigation Hold or Query-based hold, then the results will include original messages as well as any messages deleted, modified, edited, sent, received, everything will be in the search results. Far fewer instances will be found from mailboxes that did not have a prior Hold associated to the content.
This hold and search capability is built-in to Office 365 and available to organizations with the Office E3 or higher licenses that provide eDiscovery search. With Litigation Hold enabled, this completely replaces the need for Journals as content in various forms are preserved, can be documented, and can be validated.
Introduction of Advanced eDiscovery in Office 365
While the Hold and Search capabilities in Office 365 provides rudimentary functionality, many organizations want a more sophisticated Case Management system to organize searches, queries, and conduct tagging within the query results.
In 2015, Microsoft acquired a company called Equivio and integrated in their eDiscovery and Machine Learning powered compliance solution to Microsoft’s offering. Organizations that own the Office 365 E5 license has rights to use the “Advanced eDiscovery” features.
To move content from the built-in Content search to the Advanced eDiscovery, do the following: 1. From within the Office 365 Security & Compliance portal (https://protection.office.com) after completing a Content search covered in the previous set of steps, you’ll find the Search results pane on the right side will have a notation “Analyze results with Advanced eDiscovery” with a “Prepare results for analysis”, click on that “Prepare results for analysis”

2. A pop-up will ask a few more questions. Choose the items to prepare, and then under “Send email to this address when we’re done preparing the results”, key in an email that’ll notify you when the preparation is complete, then click Prepare. This process could take minutes or a couple hours dependent on how much content it needs to prepare. A notification will be sent to the email you entered in during the previous step when the preparation is done, or on the Content search page, you’ll notice the “Check preparation status” (notifying you it is still chugging along) will be replaced by “Check preparation status” and “Prepare results again” giving you indication that the preparation has completed.
3. When the preparation is complete, on the Office 365 Security & Compliance portal, in the lefthand column, scroll down to “Search & investigation” to the eDiscovery option, and then click on “Go to Advanced eDiscovery”
4. You will land at a “Cases” page that’ll note the various cases you have been working on. If this is the first time you are going to this page, your Cases list will be blank. Click the + button in the upper right to create a new case.
5. Enter in a Descriptive name for the Case (like Case between Bob and Mary on Legal Case #1234567), then click OK
There are 4 major items you can do within each case, you can “Prepare” a case (which imports the Search Content into the case management system); “Relevance” that allow you to review, search, and tag content; “Export” that allows you to report your results; and “Reports” that generates a series of analysis reports.
6. The first step is to Prepare the data. Click on Prepare at the top, and click on Setup on the left. You will see in the container all of the various Search Content you clicked to “Prepare Results for Analysis”. When you land on this initial page, you’ll notice the Pre-processing will start to process the data that was transferred over. This will take several minutes to pre-process the imported data, when completed, it’ll note that the Pre-process has “Completed successfully”.

7. Click to highlight the data you now want to fully import and click “Process” at the bottom-right of the Prepare/Setup page. This will provide you a Task Status, as well as a Process summary when all of the content has been successfully imported.

8. With the case data processed, the next step is to load the content into the machine learning analysis and relevance system, which requires yet another “load” process. Click on Relevance at the top of the page, and Loads on the left column, then click “Add files” that will process the content for analysis.

9. You can then have keywords automatically highlighted during the query and viewing process, click on the Relevance at the top / Highlighted keywords on the left column, and by clicking on +, you can add keywords and the color of the highlight

10. The next step is to perform Tracking and Tagging. Click on Relevance on the Track item, then click on Tagging at the bottom right. This will prepare the content for tagging, auto-highlighting keywords you noted in the previous step, and begin the process of analyzing the selected content

11. In the Relevance / Tag section, you can now review messages one by one, and click to tag the message as [R]-Relevant, [NR]-Not Relevant, [Skip]-Skip as part of a normal eDiscovery process of initial review and tagging of content

The Relevance / Decide and the Relevance / Test provides analysis of the results of the data on the statistical relevance of the content found and tagged.
Additionally, the Export and Reports functions within the Advanced eDiscovery allows for the case content (searched, tagged, flagged, etc) to be exported to a local machine, as well as reports generated on the information.
There are a number of variations on how information can be queried and reviewed. This document covered the most common functions, however other variations can be made.
Note: Email retention and deletion policies are specific to messages in a mailbox (either active or inactive mailbox). Mailboxes can have Holds removed, content or mailboxes can be deleted, and information can get corrupt. Organizations can protect the integrity of its content by minimizing the number of administrators that can gain access to configuration settings and user content. Mail handling policies and processes are not addressed in this document, but should be part of the day to day best practices on handling of electronically stored information.
Authored by Rand Morimoto, Convergent Computing, https://www.cco.com
About the Author
Rand Morimoto is the author of the book “Exchange 2010 Unleashed” and the President of Convergent Computing (CCO), an IT consulting firm in the San Francisco Bay Area. Dr Morimoto did his doctoral studies in Organization Management and has taught Undergraduate and Master degree courses on cyber-security, business ethics, and business law. Dr Morimoto was the Internet Security advisor to President Bush (2002-2007), authored the book “Network Security for Government and Corporate Executives,” and frequently participates as an expert witness in legal cases regarding electronic data and information integrity.
Disclaimer
This document is provided for informational purposes only and the author makes no warranties, either express or implied, in this document. Information in this document, including URL and other Internet Web site references, is subject to change without notice. The entire risk of the use or the results from the use of this document remains with the user.