Here is a walk-through to write a script that leverages the certificate authorities RESTful API to generate certificate pairs.
When we added a certificate authority (CA) to Cisco’s ISE in version 1.3, there was a tremendous interest level from the field. Companies were looking for this functionality to make BYOD and secure network access from endpoints more secure and there was a LOT of buzz about this functionality.
As the guy who flew all over the world carrying the “flag” for a built-in CA in ISE – forcing my message onto all the executives I could find why it was so important, I was naturally ecstatic to see the success of something I championed and fostered since inception.
However, as with everything, there is always a need for more! ISE admins all over the world felt it was great for the devices that are capable of onboarding, but they needed to issue endpoint certificates to devices that couldn’t go through the automated onboarding process, such as Medical Devices, Point of Sale systems, Linux, etc.
“Make it So” – Jean-Luc Picard
In ISE 1.4, we added a RESTful (REpresentational State Transfer) API for the CA to issue private key + public certificate pairs. This blog post is dedicated to showing you how to leverage that RESTful API and generate your own certificates for devices that cannot use the automatic provisioning capabilities of the BYOD onboarding process.
Major call out to Victor Ashe, one of the key team members on our small group of Rock Stars who are responsible for this CA. Victor is the original author of what I am going to show you in this blog. Thanks, Victor!
You could (of course) build a full-blown web portal that leverages this API to generate certificates for folks in your organization. However, I’m going to show you how to do this with a simple script on any Linux or MAC device using CURL. You can probably get this to work with a Windows device with CURL for Windows, but I don’t feel like doing that – so it won’t be part of the blog 🙂
Let’s Get Started
There are many tools available for REST so please bear in mind, there’s a reason we are using curl instead of a browser based REST Client, like Poster, Postman, etc. The browser-based clients just spit back the response body as text, and aren’t smart enough to treat this as a file and let you download it.
You will create two files on your Linux/MAC workstation. One we will call request.sh and the other will be called payload. The request.sh script contains the CURL command that puts the information into the API to retrieve the certificate pair. The payload file contains the details for the certificate that you are trying to generate.
request.sh:
curl -X PUT -H “Authorization: Basic YXBpdXNlcjpoaXNwYXNzd29yZA==” -H “Accept: application/vnd.com.cisco.ise.ca.endpointcert.1.0+xml; charset=utf-8” -H “Content-Type: application/vnd.com.cisco.ise.ca.endpointcert.1.0+xml; charset=utf-8” –data @payload -v –insecure https://
payload:
The resulting zip files (or any error messages upon failure) will appear in a file called result.zip. So, if the response status isn’t a 200 ok (perhaps a 400 bad request) then the result.zip file will just be a text file, so open it in a text editor to see the error message.
The Accept and Content-Type headers are needed in the request (shown above) and they have the same value. This is shown on the documentation page (described below). The Authorization header is a Basic Access Authorization header. The value for this header should be:
Basic
For the base 64 encoding, you can go to a site like this https://www.base64encode.org/ (shown in Figure 2) and go to the “Encode” tab at the top. Type in your username and password, separated by a colon (eg. apiuser:hispassword) and then hit the encode button. You’ll get something like YXBpdXNlcjpoaXNwYXNzd29yZA==. Your value for the “Authorization” header would then be “Basic YXBpdXNlcjpoaXNwYXNzd29yZA==” This is seen above in the curl command.
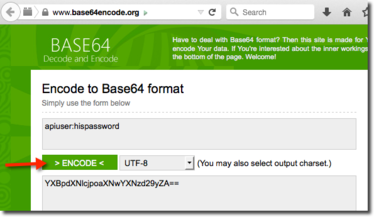 base64encode.org
 Figure 1 – BASE64 Encoder
Before you can use the script, you’ll need to enable ERS on your ISE deployment. Navigate to: Administration > System > Settings > ERS Settings. Enable ERS on the Primary Administrative Node as seen in Figure 2. Don’t forget to click Save.
 Aaron T. Woland
 Figure 2 – Enable ERS
This page will also show a URL to the ERS documentation. The URL should be https://
This documentation page has a lot of information. The most useful pages should be:
Quick Reference > Setting up Quick Reference > Request Headers API Documentation > End Point Certificates
In addition to enabling the ERS API, you will also need a ERS Admin level user. Navigate to: Administration > System > Admin Access > Administrators > Admin Users. Click Add and setup an ERS Admin user similar to the one in Figure 3. Don’t forget to click Save. This is the username and password that needs to be converted to BASE64 and inserted into the request.sh script.
 Aaron T. Woland
 Figure 3 – ersadmin
You also need a Certificate Template for the CA to use. There is a built-in certificate template to all ISE 1.3 installs named “EAP_Authentication_Certificate_Template” that you can use, or you may want to create your own brand-new template for your environment.
Figure 4 shows a custom template that I’m using for this blog post. You must specify the template name in the payload file in the certTemplateName section.
 Aaron T. Woland
 Figure 4 – Custom Template
Let’s go through an example
I created a file named request.sh. The contents of this file are shown in Figure 5.
 Aaron T. Woland
 Figure 5 – Request.sh
I also created a file named payload. The contents are shown in Figure 6.
 Aaron T. Woland
 Figure 6 – Payload
I now run the request.sh file, as seen in Figure 7.
 Aaron T. Woland
 Figure 7 – The Script Output
Figure 8 shows the resulting zip file and the extracted certificate chain (p12 file).
 Aaron T. Woland
 Figure 8 – Resulting Keychain
Again, I want to thank Val Kilmer, err… I mean Victor Ashe, for the script and the brilliant ISE CA team for all their continued hard work and top-notch delivery.