Cisco Press
In this chapter, you learn the fundamental steps required to configure and deploy your CS-MARS platform. Topics discussed include these:
Deploying CS-MARS in Your Network
CS-MARS Initial Setup and Quick Install
CS-MARS Reporting Device Setup
Creating Users and Groups
Configuring NetFlow and Vulnerability Scanning
Configuring CS-MARS System Maintenance
Configuring System Parameters
In previous chapters, you learned the difference between security threat mitigation (STM) and security information management (SIM). Understanding the advantages of deploying an STM in your environment, you now walk through the steps necessary for the initial configuration and setup of high-level system parameters that enable CS-MARS as an STM system.
This chapter discusses the first step of deploying CS-MARS, which is determining where it can be securely placed in your network. It explains how to configure the information required for network communication and alert notification, and includes instructions on how to use the CS-MARS web interface to add devices that will report to the CS-MARS appliance. You will learn how to add users and groups to administer your CS-MARS appliance and how to use NetFlow and configure vulnerability scanning, which will significantly increase the accuracy of attack recognition. Finally, you will learn about system maintenance tasks and how to configure system parameters.
After applying the information in this chapter, you will have a fully operational CS-MARS STM device.
Deploying CS-MARS in Your Network
Before you start configuring your CS-MARS appliance, you need to make the critical decision of where CS-MARS should be placed in your network. This decision is important for the security of your network and the security of data going to and from your CS-MARS device. Your CS-MARS appliance data and your CS-MARS appliance itself are prime targets for an attacker who wants to compromise your network.
Just some of the information hackers could glean if they had access to the data stream going to and from your CS-MARS appliance would include the following:
IP addresses
Device names
Source and destination pairs
Attack information
Vulnerability information
Operating system information
The CS-MARS box itself would be a prime target because if attackers can access the box, they could change policies and hide attacks that they might launch against your critical assets.
Because of the importance of this device and its data, you don’t want to place it where it can be easily compromised or where attackers might be able to run network sniffers and harvest information about your network.
Network Placement
Normally you want to place CS-MARS in a part of your network where normal users don’t have access. These networks are called out-of-band networks. Conversely, in-band networks are networks where user, voice, and video data are located. In relation to out-of-band (OOB) networks, in-band networks are considered insecure. In-band networks are susceptible to many types of attacks by which an attacker can gain control of a device and gain leverage to attack other devices in the network or sniff traffic on the network; the attacker might then learn critical information such as device configurations, IP addresses, usernames, or passwords. Because out-of-band networks don’t have user workstations, they are considered to be much more secure. Of course, all this information assumes that when the administrator set up the in-band and out-of-band networks, the switches and routers were configured with the proper commands so that attackers can’t “hop” between networks.
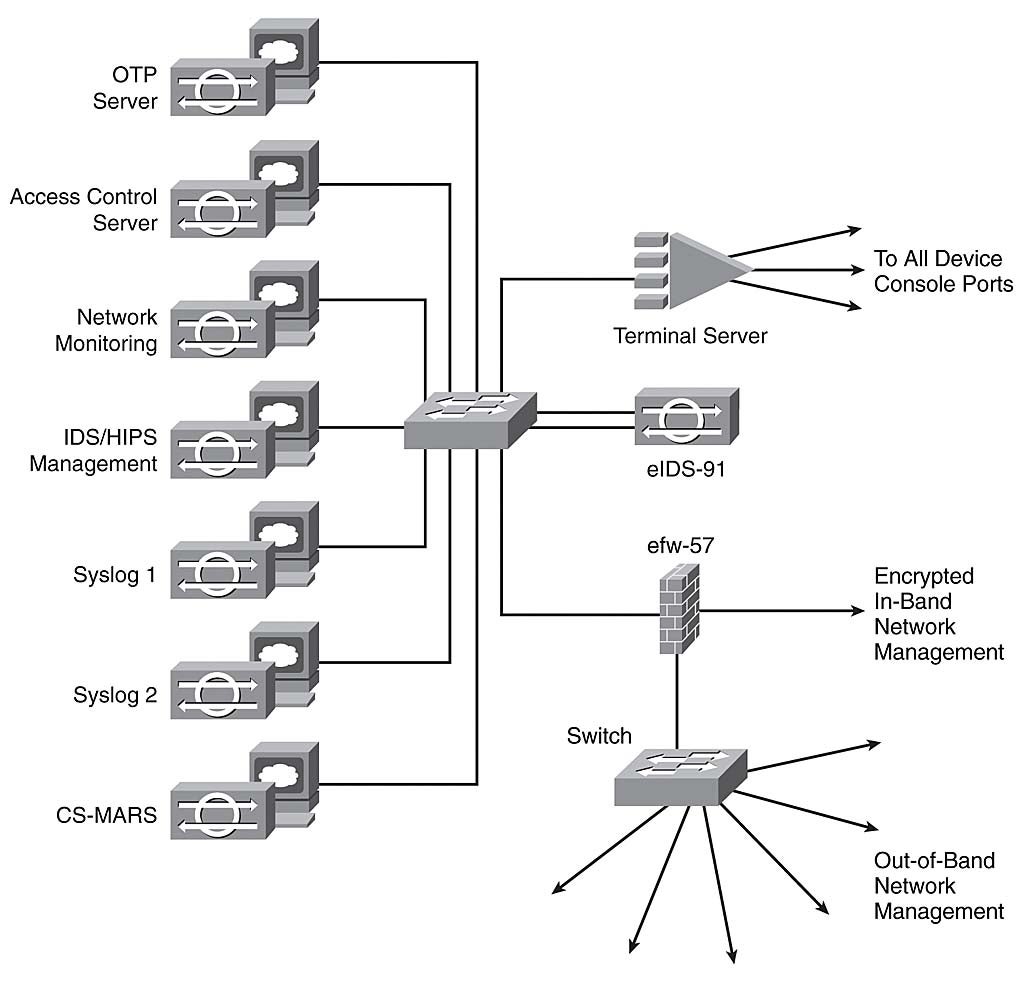
Because out-of-band networks are considered more secure, we recommend that you place your CS-MARS device and all other security-management devices, such as password servers, syslog servers, Network Time Protocol (NTP) servers, and domain name services (DNS) servers in these networks. Figure 5-1 shows a very simple illustration of components that are commonly found in an OOB network.
OOB networking for management devices is an “ideal” best practice, and sometimes it’s not possible to implement them because of distance limitations, interface limitations, and various other factors. At best, if you need to place critical management devices in user networks, you should try to encrypt traffic that is sourced from and destined to those devices. As an alternative, if management traffic needs to traverse your in-band network, you should always keep your management device protected from the user networks with a combination of firewalls and intrusion-prevention appliances.
The bottom line is that, depending on how your network is set up, CS-MARS should be deployed in the most secure area possible. Table 5-1 lists the network types from most secure to least secure and provides an explanation of the presumed security level of each area.
Management Network
Table 5-1 Network Placement for CS-MARS
Network Connection Type | Description |
OOB management network segment | This is the preferred network segment for your CS-MARS appliance. There should be no user access except by security administrators. Make sure that all switches are locked down to protect against Layer 2 attacks and that there are no open ports where an attacker can connect a PC. |
In-band encrypted | You should place CS-MARS in an in-band network only if you can encrypt all data going to and coming from the CS-MARS appliance. This ensures that even if attackers have access to your in-band network, they cannot steal network and attack data going across this network. Also make sure that all switches are locked down to protect against Layer 2 attacks and that there are no open switch ports where an attacker can connect a PC. The greatest risk in this network scenario is that an attacker might be able to guess the IP address of your CS-MARS device and try brute-force password attacks against the appliance. If you have an IPS device on the same network as your management interface, you will be able to recognize and mitigate these types of attacks. |
In-band appliance protected | If you can’t encrypt data to and from your CS-MARS device, you should have a firewall and a network intrusion-prevention (IPS) device between the CS-MARS box and the user network. The attacker should have his hands full figuring out how to directly compromise the device with these appliances in place. |
In-band | This scenario is not recommended and should be avoided at all costs. This gives an attacker free rein to try to sniff data off the network and to try to gain management access to the appliance. |
CS-MARS Security Hardening
The earlier “Network Placement” section goes into a lot of detail about how you should treat CS-MARS as a critical secure network component and ensure that it is deployed properly in your network. You should not be intimidated by this; the good news is that this is the only task besides administering usernames and passwords that you need to worry about when installing CS-MARS. Normally, when you deploy a host, server, network, or security device in your business or enterprise network, you want to complete several tasks before using the new device. The following is a list of typical security best practices, depending on the type of device:
Apply current operating system patches
Apply current application patches
Analyze configurations and remove unneeded services that could be exploited by malicious network activity
Turn off or secure clear-text services to the security appliance
Correctly apply access control lists limiting connectivity to the inside of your network
Enable auditing functions
Apply registry and file-sharing security as recommended by the operating system vendor
Install antivirus software from a leading vendor
Install host or server intrusion prevention
On the CS-MARS platform, the developers have done these tasks for you, either by design or based on input that you provided to the CS-MARS appliance when adding devices or setting global parameters.
The CS-MARS appliance is built on a Red Hat Linux operating system that has been heavily modified and security-hardened by CS-MARS developers. Because of this, you will never need to install typical operating system components or application patches. This type of maintenance is common for other vendors that install security software on off-the-shelf operating systems (OS). However, Cisco has assured its customers that if a security vulnerability is found in any of its devices, including CS-MARS, it will immediately provide a patch to protect against malicious software that could exploit this vulnerability. It should be noted, however, that when this book was written, Cisco and Protego had shipped CS-MARS for more than three years, and no vulnerabilities had been identified for this product.
The other major task that you need to do if you purchased an off-the-shelf security product that runs on a commercial operating system is to turn off the unused network services, such as Hypertext Transfer Protocol (HTTP), Simple Mail Transfer Protocol (SMTP), File Transfer Protocol (FTP), and Internet Control Message Protocol (ICMP). Although it’s impossible to turn off all network services on a security device installed on an off-the-shelf OS, the developers of CS-MARS either have turned off unnecessary services, have never installed them, or have modified the services that are enabled to eliminate known vulnerabilities. In some cases, such as SMTP, the developers implemented the protocol to allow only the skeleton requirements needed by CS-MARS.
The bottom line is that you need to do a minimal amount of work to secure your CS-MARS appliance; most of these types of tasks have been completed for you by CS-MARS developers or because of the architecture of CS-MARS.
Table 5-2 lists typical network and host-hardening tasks and shows how CS-MARS either does these tasks for you or eliminates the necessity for you to perform the task.
In addition to traditional security-hardening tasks such as those mentioned previously, CS-MARS adds hardening features to protocols that are required for CS-MARS functionality.
Table 5-2 Security-Hardening Tasks
Required Security-Hardening Task | Hardening Achieved | User Interaction |
Apply current operating system hot fixes | Because CS-MARS is written on a special developer’s version of Red Hat Linux operating system, no operating system hot fixes are required. | No action is required on your part unless Cisco releases a security alert in conjunction with a software patch for this appliance. |
Apply current application patches | Because CS-MARS is written on a special developer’s version of Red Hat Linux operating system, no application patches are required. | No action is required on your part. |
Analyze configurations and remove unneeded services that could be exploited by malicious network activity | CS-MARS developers never installed unneeded services, and they modified existing services to reduce or eliminate the possibility of vulnerabilities that attackers could exploit. | No action is required on your part. |
Harden or remove clear-text services to the security appliance | The clear-text protocols used by CS-MARS are Telnet and syslog. These clear-text protocols are required to support existing legacy reporting and management applications used by most security and network devices. | As recommended in the previous section, if you are using clear-text protocols, you should either isolate your CS-MARS appliance in an out-of-band network or encrypt the clear-text data if it traverses a user network. |
Correctly apply access control lists limiting connectivity to your security device | CS-MARS communicates only with devices that you have added to its device database, so access control lists are not required. | No action is required on your part. |
Turn on auditing functions | Full device-auditing features are turned on by default in the CS-MARS appliance. | No action is required on your part. |
Apply registry and file-sharing security as recommended by the operating system vendor | CS-MARS developers have written the operating system and the CS-MARS applications so that a registry, as we know it, is not required and file sharing does not exist. | No action is required on your part. |
Install antivirus software | Because CS-MARS is a hardened OS with IP tables for inbound and outbound connections, the probability of virus outbreak is very low. | No action is required on your part. |
Install host or server intrusion prevention | Because CS-MARS is a hardened operating system that tightly controls its operating environment and controls applications with code that can be executed, the probability of exploit is very low. | No action is required on your part unless Cisco releases a security alert in conjunction with a software patch for this appliance. |
Protocol Security Hardening
CS-MARS employs additional protocol security hardening in four ways:
Enforcing directional control on protocols that it requires on the appliance using IP tables
Allowing local protocol access only
Selectively allowing protocol access using device-authentication mechanisms
Sandboxing your computer command-line execution and the internal database
Enforcing directional control In some protocols, which would normally be bidirectional, CS-MARS has ensured that inbound traffic is not accepted. SNMP is an example of this. CS-MARS uses SNMP to notify predefined users in the case of a high-severity event, but SNMP on a CS-MARS appliance does not accept inbound traffic; therefore, the SNMP server cannot be exploited from the outside.
Allowing local protocol access only Because CS-MARS uses the Oracle database to store and organize its device and event data, it requires a piece of software called a Transparent Network Substrate (TNS) listener. CS-MARS architects used the developer’s version of Red Hat Linux and built CS-MARS applications from scratch, so access to the TNS listener is restricted to only the CS-MARS appliance itself. The only exception to this is if you elect to deploy a configuration called Local Controllers (LC) and Global Controllers (GC) on CS-MARS. When the LC-to-GC deployment is made, the TNS listener is used only within the HTTPS connection between LC and GC devices.
Selectively allowing protocol access using device authentication If you decide to use local and global CS-MARS devices as suggested in the previous bullet point, it’s required that the Global Controller talk to the Local Controller database. In this case, the TNS listener must accept data from outside devices. Because CS-MARS developers wrote the CS-MARS application with security in mind, they employed a device-authentication mechanism that ensures that the remote CS-MARS appliance that you defined is the only device that can communicate with the local TNS listener.
Sandboxing your command-line execution The CS-MARS developers wrote a custom command-line parser that restricts operating system command execution to just a few lines. These commands are used solely to troubleshoot, configure CS-MARS, view some global parameters, or view statistics. This ensures that if hackers were able to gain access to your CS-MARS command-line interface (CLI), they would not be able to run traditional Linux commands to manipulate execution or install malicious code such as rootkits. To protect the CS-MARS operating system even more, all compilers and development libraries have been removed from the system. This ensures that in the unlikely event that attackers gained access, they would not be able to create or modify code on the device.
CS-MARS Initial Setup and Quick Install
One of the greatest assets of CS-MARS is that it’s extremely simple to set up, regardless of your level of technical expertise. A novice can easily follow the step-by-step process in this chapter and have a fully configured CS-MARS appliance when the steps are completed. In fact, the steps are exactly the same and just as easy, whether you are a novice system administrator or an experienced security or network engineer.
This book describes two different methods for initially setting up and installing CS-MARS. The first method, which is covered in this chapter, involves connecting a keyboard and a video monitor to your CS-MARS appliance and completing the initial setup using direct input through the keyboard. The second method is defined in Appendix F, “CS-MARS Console Access.” It involves connecting your PC using the asynchronous serial port of your CS-MARS device and a terminal emulator and entering the initial configuration information on your keyboard. After you have successfully configured your CS-MARS device, you can access the device using the CS-MARS web interface. This requires the Microsoft Internet Explorer v6.x application, the Adobe VGA Viewer IE plug-in, and a network connection to the CS-MARS appliance.
The initial steps you need to perform to enable your CS-MARS device for deployment are the following:
Step 1 Complete the initial CS-MARS configuration.
Step 2 Enter system parameters using the CS-MARS web interface.
Complete the Initial CS-MARS Configuration
Completing the initial configuration for CS-MARS is a simple nine-step process. After you have completed this process, you can access your CS-MARS device with the web interface, complete additional steps required to add devices to the CS-MARS device database, and also configure system parameters. These steps make up the initial configuration process:
Step 1 Connect the video and the keyboard to the CS-MARS backplane.
Step 2 Power on the CS-MARS device.
Step 3 Log into CS-MARS using the factory default username and password.
Step 4 Change the default username and password.
Step 5 Set the time zone or synchronize to an NTP server.
Step 6 Set the desired date.
Step 7 Set the desired time.
Step 8 Set the IP address for your CS-MARS interface.
Step 9 Ensure connectivity between your CS-MARS device and your administrative management workstations.
The following is a description of the steps you need to perform to initialize your CS-MARS appliance:
Step 1 Connect the video and the keyboard to the CS-MARS backplane—While the device is powered off, simply connect a standard computer monitor and video cable to the video out on the CS-MARS backplane. After the video is connected, simply insert a standard keyboard and keyboard cable into the keyboard port on the CS-MARS backplane. See Figure 5-2.
CS-MARS Backplane
Step 2 Power on the CS-MARS device—Plug the CS-MARS power cable into the device backplane then into a standard 110 volt AC outlet. There are two switches used to power on the device; first press the power switch on the CS-MARS backplane, and then remove the face plate and press the power switch on the front of the device.
Step 3 Log into CS-MARS using the factory default username and password—When the CS-MARS device has completed its power cycle, you are presented with a username prompt. Enter pnadmin for both the username and the password.
Step 4 Change the default username and password—Enter the command passwd; you are prompted to change the username and password. Because CS-MARS is a critical device in your network and has access to most of your security, network, hosts, and server devices, it’s a best practice to use a password that will be very difficult to guess if somebody gains physical or remote access to this device. General guidelines are to use a password with greater than eight characters that contains uppercase, lowercase, numeric, and special characters. Under no circumstances should your password be a word that can be found in a dictionary, English or otherwise.
Step 5 Set the time zone or synchronize to an NTP server—The first step you need to do is either manually set the time zone where your CS-MARS device is located or point your CS-MARS device to an NTP server. Step 5 Without synchronizing times among your CS-MARS appliance, your management workstations, and your reporting devices, you face several potential problems:
— Management workstations will not be capable of connecting to CS-MARS devices because self-signed certificates will appear to be expired.
— The dates on CS-MARS reports will not be accurate. This is especially a problem if you are using CS-MARS data for forensic analysis or you plan to use this data in a legal deposition or at a trial.
A fundamental feature of CS-MARS is to correlate event logs and alerts from many different network and security devices. These devices can be located anywhere in the world and in any time zone. To enable CS-MARS to accurately correlate information regardless of geographical location to a common time source, you must configure the accurate date, time, and time zone. The date, time, and time zone can be set manually, but it’s much easier and much more accurate to simply point your devices to an authoritative Network Time Protocol (NTP) server.
The time zone can be set manually via the CLI using the timezone set command. After you enter the command, a text wizard steps you through the process of defining your time zone.
Step 6 Set the desired date—For the same reasons you need to synchronize time zones, you also need to ensure that the correct date is set on your CS-MARS device. As with the time zone, the date can manually be set or can be synchronized and set using an NTP server. Use the CS-MARS CLI command date dd/mm/yyyy to set the current date.
Step 7 Set the desired time—The same logic and reasoning applies to setting the desired time. As with the time zone, the time can manually be set or can be synchronized and set using an NTP server. Use the CS-MARS CLI command time hh:mm:ss to set the current time.
Step 8 Set the IP address for your CS-MARS interfaces—The ifconfig command is used to set the IP address on the CS-MARS interfaces. This command uses the standard UNIX ifconfig syntax. In the examples in this book, we use the default IP addresses on the CS-MARS interfaces. The Ethernet 0 default IP address is 192.168.0.100, and the Ethernet 1 default IP address is 192.168.1.100. Either of these IP addresses can be used for management access through an administrative workstation.
To change the IP address on your CS-MARS interfaces, use the CLI command ifconfig eth0
Every time an IP address is changed, CS-MARS requires a reboot of the system.
Step 9 Ensure connectivity between your CS-MARS device and your administrative management workstations—You need to ensure that you have SSL/HTTPS access and network connectivity between your CS-MARS device and your management workstations. Connectivity can be verified using the ping command on either the workstation or the appliance, and management protocol connectivity can be verified using a browser and entering HTTPS://192.168.0.100 (or the IP address you used for your CS-MARS interface). If either the ping or the browser access fails, you must work with your network administrators to ensure that you have a route between your workstation and the appliance and that no access lists are blocking TCP port 443 or ICMP traffic.
When you have completed these steps, continue to the next section to add devices and set system parameters to activate your CS-MARS appliance.
Enter System Parameters Using the CS-MARS Web Interface
The only supported browser for the CS-MARS web interface is Internet Explorer (IE) v6.0 SP1; it’s assumed that higher versions will work. Before you use the browser to access your security appliance, you must make the following changes:
Turn off web page caching—This ensures that current web pages are always returned from the CS-MARS device. If you don’t do this step, when you make a change to the CS-MARS configuration and then use your browser to check your configuration, you likely will see old data and not the change that you just made.
Configure IE with a medium security level—This enables ActiveX controls and scripting required by the web interface.
Configure IE to a privacy level of medium—By default, this allows cookies that are required for the correct operation of the CS-MARS web interface.
Configure IE to allow popups from the CS-MARS—CS-MARS uses popup windows to display several different types of information. Without this configuration, you will not be able to use the CS-MARS web interface. Your system might have other popup blockers besides the default IE blockers; you must make sure all of them are set to allow popups from CS-MARS.
If you are having any trouble making these changes on your system, refer to the excellent detailed step-by-step description on the Cisco website. You can access that information by browsing to https://www.cisco.com/go/mars and clicking on the Install and Upgrade link; then follow the links to the CS-MARS 4.1 Install and Setup Guide.
Enter System Parameters to Activate Your CS-MARS Appliance
Now that you have the correct browser, the correct browser configurations, connectivity to your appliance, and the appliance IP address, you are ready to make some basic configurations and activate your appliance.
The following is a step-by-step procedure to activate your CS-MARS appliance.
Step 1 Enter your username and password. The screen shown in Figure 5-3 appears. The default username and password are pnadmin/pnadmin.
Figure 5-3
CS-MARS License Entry Panel
Step 2 Enter the license key for your CS-MARS appliance. This should have been shipped with your device. If it was not included or you have misplaced it, send an e-mail to licensing@cisco.com or browse to Cisco’s licensing website to get a license.
You will notice that no matter what selection you chose on the GUI, you are prompted for the license key.
Step 3 After you enter your license key, CS-MARS presents you with a screen to enter the initial configuration for your appliance.
The screen that is displayed contains cells to enter (see Figure 5-4).
— IP address for the second CS-MARS interface
— Default gateway
— Mail gateway
— DNS address information
Step 4 Enter the required values for each of these fields.
CS-MARS Basic Configuration Panel
Step 5 Make sure you include DNS addresses. The CS-MARS device generates reports that contain source and destination IP addresses. The CS-MARS appliance will resolve these names as long as you have defined your DNS servers. If you don’t define your DNS servers, you must manually resolve addresses, which severely impacts the speed and accuracy of your analysis process.
Step 6 You have flexibility on how you can use the interfaces of your CS-MARS device. The basic functions provided by the CS-MARS interfaces are data collection and device management. The interfaces can be used for either of these purposes. For example, you could use one interface for device management or event collection, or both. You could also choose to use one interface for data collection and the other for device management.
Step 7 CS-MARS uses the mail information to send alerts or reports to certain mail addresses when alerts or reports are generated, so it’s important to populate this field appropriately.
Step 8 After the data is entered, click the Update button at the bottom of the page. This sends the data to your appliance and saves the configuration.
CS-MARS Reporting Device Setup
Now that you have configured the basic parameters for CS-MARS and have connectivity to the appliance, you must add the devices that will be communicating to your CS-MARS device. This section provides an overview of how to set up reporting devices. For more detailed information on how to configure reporting devices, reference The User Guide for Cisco Security MARS Local Controller. This document is located on the Cisco website at https://www.cisco.com/go/mars. Follow the links to product literature, support, and documentation.
CS-MARS supports three main types of devices:
Hardware-based security devices—These are devices that are traditional network and security appliances, such as routers, switches, security appliances, firewalls, web proxies, and intrusion-prevention devices.
Software-based security devices—Software devices are applications that run on hosts or servers. These include Apache web server, IIS server, or other software-based network or security services.
On-demand security services—These are subscription-based services provided by vendors using a central security operations center or management center.
Adding Devices
Two methods are used to input device information into CS-MARS:
Manual device entry
Comma-separated variable (CSV) seed file imports
Manual Device Entry
The first method for device entry is the manual method. Using this function, you enter all your known devices into CS-MARS to enable CS-MARS to use their information for log integration, log correlation, and topology discovery. You are asked to enter the following information for each device. This list isn’t absolute, however. For example, in some cases, you won’t be able to enter SNMP-RO information; in other cases, you might not be able to enter usernames and passwords. Don’t worry about this. Enter what you can, and CS-MARS will use whatever information it can glean from the information that you do give it.
The following is a list of general information you can use to add devices to CS-MARS. Note, however, that most devices require only a subset of this information for CS-MARS to begin communications.
Device name (required)
Access IP address (IP used for Telnet, SNMP, or SSH access to the device; required)
Reporting IP (source IP address of reporting data; required)
Access type (Telnet, SSH, FTP)
Username
Password
Enable password
Config path
Filename
SNMP-RO community string
Monitor resource usage
Interface IP addresses and subnets (needed for path calculation only)
If a device is not entered into CS-MARS or is improperly configured in CS-MARS, the appliance classifies and reports any data it receives as an “Unknown Reporting Device,” and the data from these devices is not used in CS-MARS for attack analysis.
One of the more impressive features of CS-MARS is that after you enter the information of your network and security devices, CS-MARS uses that information to access those devices, analyze the device configurations, analyze interface parameters, and analyze route and Content Addressable Memory (CAM) tables to determine your network topology. This is discussed in detail in Chapter 4, “CS-MARS Technologies and Theory.”
The following steps are taken when manually adding a device on your CS-MARS appliance.
Step 1 In the CS-MARS GUI, navigate to the panel to add devices: Admin > Security and Monitoring Information. Figure 5-5 is the starting panel for adding network devices.
Figure 5-5
CS-MARS Add Device Panel
When you’ve accessed this panel, click the Add button to enter a new device. Figure 5-6 appears.
Figure 5-6
CS-MARS Device-Configuration Panel
Step 2 You must make a selection from the Device Type pull-down list. These are the default devices that have reporting features that CS-MARS supports. Figure 5-7 shows those devices and categorizes them by HW-based security device, SW-based security device, and on-demand security device.

CS-MARS Device Pull-Down Menu
Notice that the devices that are supported in this pull-down list are not only Cisco devices, but devices from most of the popular security vendors. Chapter 6, “Reporting and Mitigative Device Configuration,” has a complete list of supported devices and vendors. The following is a partial list of third-party vendors that CS-MARS supports:
— Cisco Systems
— Extreme Systems
— NetScreen
— Network Appliance
— ISS
— Qualsys
Step 3 In the example for this chapter, you add a Cisco Intrusion Prevention 5.0 device.
Select Cisco IPS 5.x from the Device Type pull-down menu. You are presented with the panel to add an IPS 5.x device, illustrated in Figure 5-8. Note that because not all devices have the same configuration characteristics and reporting formats, this screen might differ, depending on the device selected.
Figure 5-8
IPS Device Entry Panel
Step 4 You must fill in the following information to enable this device as a CS-MARS reporting device:
— Device Name—This is name that has been configured with the IPS CLI or IPS web interface as the device name for this device.
— Reporting IP—This is the IP address for the management interface of this device. Make sure this interface is routable to the CS-MARS device. In this example, the IPS device has an address of 192.168.0.222.
— Login—This is the administrative username for the IPS device.
— Password—This is the administrative password for the IPS device.
— Port—Unless otherwise configured on the IPS device, this value should always be 443.
— Monitor Resource Usage—Select Yes if you want CS-MARS to report when this device uses excessive hardware resources.
— Monitored Network—This selection tells CS-MARS that this device will be sending alert information for the IP addresses that are members of the defined subnets in this table. It is important that the proper information is placed in these fields because CS-MARS uses this data for path calculation and alarm data. A best practice is to enter the exact subnets from inside your network that this IPS device monitors. Do not summarize these entries! If all your subnets are not present in the Select a Network drop-down list, you can manually put them in using the Define a Network selection. In this example, the monitored networks are 192.168.0.0/24 and 192.168.1.0/24.
You must also ensure that, on the IPS device, the address of the CS-MARS device is included in the IPS’s “allowed” access list. Readying devices for CS-MARS access is discussed in depth in Chapter 6.
Step 5 When this configuration panel is completed, you must click the Test Connectivity button. You will see a screen that indicates that discovery of this device is in progress. If the discovery fails, an Internet Explorer popup screen appears. If it’s successful, an Internet Explorer popup screen reads “Discovery is done.”
Step 6 When the device is discovered, you must click the Submit button to add the IPS device to your device list.
Step 7 After adding the device to your device list, you need to activate your work. Select the Activate button, in the upper-right corner of the CS-MARS window.
Activation is important in the CS-MARS world. When you make changes through the web interface, your changes are written to the CS-MARS database but do not take effect until they are activated. Activation is achieved simply by selecting the Activate button.
After activation, your CS-MARS screen looks like Figure 5-9.
Figure 5-9
CS-MARS Added Device List
You can also confirm that CS-MARS recognized your device by navigating to the topology page and verifying that an icon for the IPS device has been added to the Summary page, as shown in Figure 5-10. Your topology should show your CS-MARS device, two subnets that are displayed as Layer 2 switches, and the IPS device you just loaded. In this configuration, the address of the IPS device is 192.168.1.222. The two subnets 192.168.0.0 and 192.168.1.0 show up as connected routes to the CS-MARS device because of the interface IP addresses, and the IPS device shows those addresses for two reasons: The management interface of the IPS box is in the subnet 192.168.0.0, and when we added the device, we told CS-MARS that the IPS device is monitoring 192.168.0.0 and 192.168.1.0.
CS-MARS Network Topology Display
This example using SSL is just one of many different ways to add devices to CS-MARS. SNMP is important and should not be overlooked. CS-MARS extensively uses the information from SNMP device databases to discover network topology and as a method to make configuration changes for attack mitigation. Discovery and mitigation are covered in depth in Chapter 4.
These Cisco devices have SNMP support through the CS-MARS appliance:
Cisco adaptive security appliances
Cisco IOS routers, Version 12.2 and higher
Cisco PIX firewalls
Cisco Catalyst switches/CATOS
Cisco Catalyst switches/IOS
Cisco Virtual Private Network (VPN) concentrators, Version 4.03 and higher
CSV File Import
From the previous section, which explained how to manually add a device, you have probably observed that adding devices is easy but that it would be very time-consuming to add several devices. If you are an enterprise with 20 or more devices you need to add to the CS-MARS database, it might make sense to use CSV file import, which was designed to add multiple devices.
A CSV file must be created in a specific format so that CS-MARS can correctly use the information for its intended purpose. Each entry contains the same information that Figure 5-6 showed.
The detailed format for a CSV file is documented in The User Guide for Cisco Security MARS Local Controller, found on the Cisco website at https://www.cisco.com/go/mars. Follow the links to product literature, support, and documentation until you find the document titled Install and Setup Guide for Cisco Security Monitoring, Analysis, and Response System, Release 4.1. Within that document, search for the string “add multiple devices using a seed file.”
After you create a CSV file with all your devices and appropriate access information, you must import that file into CS-MARS.
Using a CSV Device Import File (Seed File)
First create the file with an entry for each of the devices you need to add to CS-MARS. This file is called the seed file.
The information for each device and CSV seed file format is listed in Appendix C, “CS-MARS Supplements.”
The following is an example of a seed file that could be used to import a PIX firewall, two NetScreen devices, and two IOS devices into CS-MARS.
192.168.10.1,,,,PIX,TELNET,,,cisco,,,,,,,,,,,
24.3.24.100,,,,NETSCREEN,SSH,netscreen,ns3146wsdf,,,,,,,,,,,,
192.168.10.2,,,,NETSCREEN,SSH,netscreen,tt160p91,,,,,,,,,,,,
50.1.1.200,,,,IOS,TELNET,,,Qa$1*5ft,gt$*j15,,,,,,,,,,
10.10.10.1,,,,IOS,TELNET,,,telnetpass123,,,,,,,,,,
In this example, for simplicity, we add a single PIX 7.0 firewall and use the following information in the seed file.
192.168.0.150,,,,PIX7X,ssh,sshuser,cisco123,,Cisco
Step 1 After the seed file has been created, you need to once again navigate to the Admin > Security and Monitoring Information panel. This time, instead of adding a device, click the Load from Seed File button. A browser popup prompts you for the FTP location of your seed file. Figure 5-11 shows the prompts and the value used for this example.
Figure 5-11
CS-MARS Seed Import Configuration Panel
Step 2 After the seed file has been submitted, CS-MARS automatically discovers the devices that were in your seed file and notifies you with a browser popup when the devices have been discovered.
Step 3 You must then navigate back to the previous screen and click the Activate button.
Step 4 Then, as you did when you manually added a device, go to the Summary page and view the topology map to see your device.
Creating Users and Groups
The next step to get your CS-MARS devices ready for deployment is to create users and groups that are allowed to interact with your CS-MARS device.
You can create four types of users to manage your CS-MARS environment:
Admin
Security analyst
Notifications only
Operator
Each of these user types has a specific set of functions it is allowed to perform on a CS-MARS appliance.
Admin—This is the equivalent of a superuser. The admin account has full control on a CS-MARS appliance. The pnadmin account is the only account that can access the CS-MARS through SSH for CLI operation.
Security analyst—This user can access all areas of the CS-MARS web interface and CLI, except for the Admin configuration panel.
Notifications only—These are accounts that can receive e-mails or reports generated by CS-MARS. These users can view only report data related to the notification they received.
Operator—An operator has access to the CS-MARS device GUI but in read-only mode. This type of user cannot make changes to the system.
The following steps describe how to add users to CS-MARS.
Step 1 First, you must navigate to Admin > User Management. If you have a default installation, the only user created is the pnadmin user, labeled as Administrator (pnadmin).
Step 2 Before you set up accounts, you need to identify each user that needs access to the CS-MARS device and then what function that user needs to perform. Then you input each user through the Admin > User Management configuration panel and associate them with the appropriate group.
CS-MARS enables you to enter a significant amount of informational data for each user. It should be considered a best practice to enter all the data you possibly can. In many industries, regulations require you to do this, but this also can save you significant time if you need to contact CS-MARS users in the middle of a threat response.
Configuring NetFlow and Vulnerability Scanning
At this point, your CS-MARS device is capable of accepting and analyzing logs and security alerts, but with the addition of NetFlow and vulnerability scanning, your CS-MARS appliance will be a much more powerful security solution.
The addition of NetFlow enables CS-MARS to recognize traffic anomalies and baseline network behavior.
The addition of vulnerability scanning enhances the already considerable capability of CS-MARS to tell the difference between a real attack sequence and a false-positive attack sequence.
NetFlow Configuration
Simply speaking, NetFlow is a core technology built into many Cisco routers that reports the number of flows on a per-port, per-IP address basis (source and destination). Cisco defines NetFlow as follows:
[NetFlow] efficiently provides a key set of services for IP applications, including network traffic accounting, usage-based network billing, network planning, security, Denial of Service monitoring capabilities, and network monitoring. NetFlow provides valuable information about network users and applications, peak usage times, and traffic routing. Cisco invented NetFlow and is the leader in IP traffic flow technology.
Note – For an in-depth discussion of NetFlow, go to https://www.cisco.com/go/netflow on the Cisco website.
Most security experts agree that NetFlow in a CS-MARS environment adds substantial value because its rate of false positives is very low and its capability to recognize previously unknown attacks is very high. Chapter 4 discusses NetFlow and how it is used in conjunction with CS-MARS.
Enabling NetFlow on a CS-MARS appliance is a straightforward task.
Step 1 First you must navigate to the Admin > System Setup > Device Configuration and Discover Information > NetFlow Config Info panel.
Step 2 Enter the port that will listen for NetFlow data. The default is UDP 2055, but NetFlow is user configurable on routers, so you might want to verify with a network engineer which port is being used for NetFlow.
Step 3 The next option enables or disables NetFlow on the CS-MARS device. The collection and processing of NetFlow data is enabled by default. If your network is not NetFlow enabled, select No.
Step 4 The next selection provides you with an option to store NetFlow records. If you select Yes, this tells CS-MARS that you want to store every NetFlow record. This can potentially slow down your CS-MARS system because it has to write many more events than if you select No. If you select No, you are telling CS-MARS that you want to store only NetFlow traffic that represents an anomaly or is part of a session that triggered a Step 4 rule. Generally, unless dictated by industry or government regulations, you select No for this option. If you select Yes to store NetFlow data, your CS-MARS counts every flow as an event, thus impacting your CS-MARS appliance EPS rate.
Step 5 The last option is to define which networks you want to evaluate NetFlow data. Because flow anomalies can show up on any device that might inadvertently run malicious software or might be misconfigured, a best practice is to define all the networks over which CS-MARS will be reporting. If this table is left blank, CS-MARS will process flows for all subnets that it learns about.
Step 6 After all the data is entered, select Submit to enable NetFlow. This readies your CS-MARS device to listen for NetFlow data. At this point in the setup, you haven’t yet configured any devices to send NetFlow, so this won’t have an impact on your CS-MARS reporting until you configure your routers as described in Chapter 6.
Figure 5-12 shows the completed NetFlow configuration panel.
Step 7 Click Activate on the top-right side of the CS-MARS page.
Figure 5-12
CS-MARS NetFlow Configuration Panel
Dynamic Vulnerability Scanning Configuration
Vulnerability scanning is a feature that vastly increases the accuracy of CS-MARS threat reporting.
When vulnerability scanning is enabled on your CS-MARS device, CS-MARS will not conduct a vulnerability scan until a rule is triggered as a result of an event or session.
Configuring CS-MARS to conduct dynamic vulnerability scanning is a very simple process (see Figure 5-13):
Step 1 Browse to Admin > System Setup > CS-MARS Setup and click Networks for Dynamic Vulnerability Scanning (Optional).
Step 2 Select the radio button for the method you want to use to enter the network or IP range of the systems in which you want scanning to be enabled.
Step 3 Use the drop-down box to select the network of your choice, manually enter the network and mask, or manually enter a range of IP addresses.
Step 4 Click the Add button to add your selection to the pane. Click the Remove button if you want to remove your selection.
Step 5 Repeat steps 2 through 4 until you have entered all networks or IP ranges you want to have scanned.
Step 6 Click the Submit button to submit your changes.
Step 7 Click the Activate button at the top-right corner of the web page to activate your configuration. When a new popup widow appears indicating that activation is done, click the Close button to close the new window.
Note – Clicking the Info button on this page opens a new window with a brief explanation of vulnerability scanning on CS-MARS.
For a more detailed description of vulnerability scanning, see Chapter 4.
Figure 5-13
CS-MARS Dynamic Vulnerability Scanning Configuration GUI
Configuring CS-MARS System Maintenance
At this point in your configuration process, CS-MARS has been configured to be ready to collect syslog messages and events, accurately correlate data, and respond to threats. You still need to configure the network devices and applications, but that is covered in Chapter 6.
This section of this chapter doesn’t require you to make any changes on the CS-MARS device; it’s just informational. You will learn about the global system variables in CS-MARS. All parameters should be set to the default unless you need to archive or retrieve data.
To configure or view maintenance parameters for CS-MARS, you must navigate to the Admin > System Maintenance panel. From this panel, you have the option to configure the following:
License keys
Upgrades
Certificates
Runtime logging levels
Viewing of archived or current log files
Viewing of the audit trail
Retrieval of raw messages
Data archiving
License keys This panel is useful if you need to configure a license key on your CS-MARS device. You simply enter the key and click Submit. If you have to do a pnreset on your CS-MARS box, you will lose the license key. Before running pnreset, you should go to this panel and write down the key. Then when pnreset is completed, come back to this panel and enter the license key.
Upgrades This panel is used to upgrade the CS-MARS system software. You must first put the upgrade package on an FTP or HTTPS server. Then enter the server’s IP address, username, password, path, package name of the CS-MARS upgrade file, and server type.
Certificates This panel is used to import Global Controller certificates and export Local Controller certificates for input to a Global Controller. See the MARS 4.1 Local Controller Users Guide for more information.
Runtime logging levels This panel is used to set the logging levels of your CS-MARS internal system logs. These levels should be set to the default unless requested by the Cisco TAC or Cisco engineering for troubleshooting purposes. Each entry that you see on this panel is a software process running in the CS-MARS operating system; the default logging level for all entries is set to trace.
Viewing of the appliance’s log files Using this panel, you can view the logs of the CS-MARS system processes. These logs show processes and process threads starting and stopping. Under normal circumstances, these logs are used only by Cisco TAC and Cisco engineering teams.
Viewing of the audit trail This panel enables you to do a query to see what operations were performed by which users on a CS-MARS device. This log shows whether a new user is added or any device database information is changed. This audit log satisfies many requirements as defined by industry or federal regulations.
Retrieval of raw messages This panel can be used to selectively retrieve raw log data that CS-MARS has received from a device in its database or archived files. You specify a time range and the name of the device whose data you need to view. A text file of the resulting data is zipped, and you are offered an option to download it to your workstation for further analysis. This operation can be done from either your CS-MARS Local Controller database or a device that has been defined as an archive location. This feature also satisfies many requirements as defined by industry or federal regulations.
Data archiving This panel enables you to define an NFS server and a location on the server to archive CS-MARS data. You also have an option on this panel to define the length of time you would like to store the CS-MARS data on the archive server. One consideration that you need to carefully examine is planning the remote storage capacity and setting the number of days of data to store on the archive location. It might take some ongoing changes before you’re satisfied with the balance between the length of time and the amount of data that you are storing on the archive server.
Configuring System Parameters
System parameters define the miscellaneous global variables such as polling intervals and authentication prompts. But this section highlights a new feature in system parameters, called distributed threat management.
These parameters can be configured or viewed in the Admin > System Parameter panel.
Windows event log pulling time interval
TACACS/AAA server prompts
Oracle event log pulling time interval
Distributed threat mitigation settings
Proxy settings
Windows event log pulling time interval This parameter defines how often CS-MARS will pull event logs from devices that are running the Windows operating system. These event logs can be valuable in discovering Microsoft Windows attacks such as brute-force password attacks. CS-MARS indicates this by correlating several Microsoft events that identify failed password attempts. CS-MARS generates incidents to reflect the source IP addresses that generate the failed login attempts and makes a recommendation to put an access list in a router to prevent those failed attempts from reaching their destination. Because the source is identified, threat responders can evaluate and take action on the system or systems that are sourcing the attack. The default polling interval is 300 seconds, or 5 minutes. If you want to lower this parameter, keep in mind that it’s possible, depending on the number of hosts you have, that network traffic volume could drastically increase. Most customers find that the default is adequate.
A best practice when polling Microsoft servers and workstations for their security event logs is to take the log data from the domain controller(s) in the network. This drastically reduces the risk of saturating your network with event log data. To accomplish this, you must configure your servers and workstations to send their log data to their respective domain controllers.
TACACS/AAA server prompts When your network devices use a TACACS/AAA server for user management and access controls, often network administrators choose to modify the login prompts on the remote devices. If the login prompts are modified from the original device defaults, CS-MARS needs to know the new prompts. This setting allows CS-MARS to use the changed prompts to gain access to your network devices for required data and mitigation.
Oracle event log pulling time interval This setting behaves essentially the same as the one for Windows polling, except it is applied to Oracle database log pulling.
Distributed threat mitigation (DTM) settings DTM is a new feature in CS-MARS 4.1 that polls Cisco IPS appliances to find out what events are firing most frequently. When CS-MARS determines this information, it calculates the top signatures and pushes the signature-definition files to IOS routers that are capable of running fully functional IPS code.
Proxy settings This setting configures CS-MARS to communicate with devices through a proxy server. This would be needed, for example, if your organization uses a proxy server for Internet control and security, and you have DNS servers and an IDS device on your DMZ. CS-MARS would need to use the DNS server for DNS resolution and to communicate with the IDS device on the DMZ. Thus, CS-MARS needs proxy settings and an access account.
Summary
This chapter covered the basic functions of installing and configuring the CS-MARS appliance.
You learned that a critical first step is determining the placement of CS-MARS in your network. The basic premise is that, according to safe guidelines, CS-MARS should be placed in out-of-band networks when possible. If it’s not possible to put CS-MARS out-of-band, you want to ensure that communications between CS-MARS and its management devices and reporting devices are encrypted to protect against network sniffing.
In addition to deployment considerations, this chapter described the steps necessary for the initial configuration and setup of high-level system parameters that enable CS-MARS as an STM system.
In Chapter 6, you will learn how to configure your network devices and hosts to communicate with your CS-MARS device. Enabling communications with these devices will make your CS-MARS device a fully functional threat-response system.
Copyright © 2007 Pearson Education. All rights reserved.